Food Service Setup
Welcome to the tutorial on setting up your Food Service Items and POS screens. As a prerequisite to this tutorial, please watch the Using the Screen Designer video article, which will provide you with the basic information on how to work with the Screen Designer. This information will be used later in the tutorial.
Unlike regular inventory items (Products) sold in your store, you can also create Food Service Items, which are prepared food items that may have different modifiers, sizes and prices. Using the integrated Food Service Item screen, you can build sandwiches, pizzas or other food items - sending the orders to a kitchen printer for preparation.
Food Service Menu
In StoreTender Pro, Back Office or HQ, navigate to Data > Inventory > Other > Food Service. There you will find two options:
- Items: Here you will set up your individual food service items, assigning modifier groups, taxes, sizes, prices and (optionally) special pricing and costs. You also assign Prep Printers for these items here.
- Modifiers: This screen will allow you to create modifier groups - addons to your Items as an included or charged addition.
Food Service Items
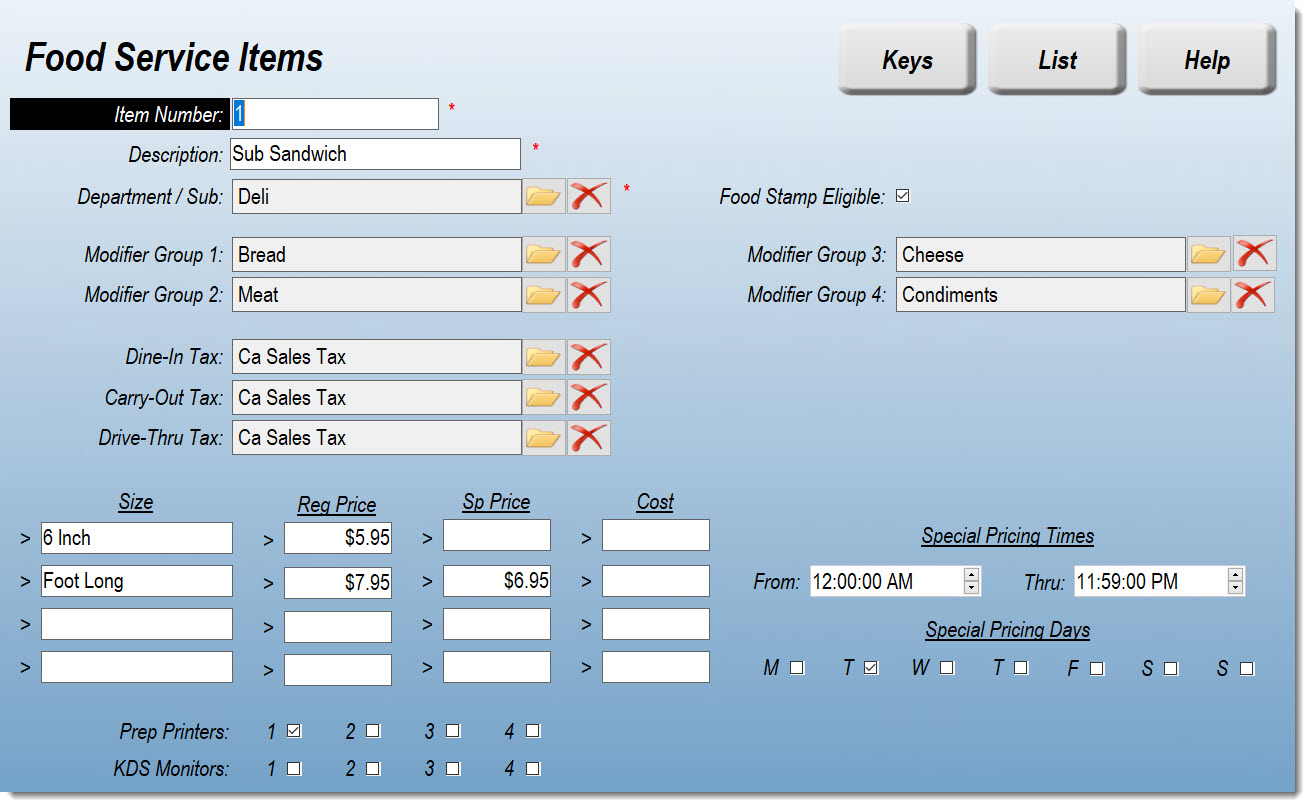
Below is a screenshot of a Food Service Item, accessed by pressing [Items] on the Food Service Items menu screen.
To create a new Food Service Item, press [NEW] on the menu. The above image will appear onscreen, with all blank fields. Most of the fields have an explanatory tooltip that will appear when you hover your mouse over the description text.
The item number will automatically populate with the next available number. We suggest leaving that alone, unless you wish to use a special number. Keep in mind that these numbers must be unique and cannot be used previously in Products or Food Service Items.
- Enter a Description for your Item.
- Select a Department and optional Subdepartment for your Item.
- Check whether or not this Item is eligible for Food Stamps as a payment method.
- You can now assign up to four Modifier Groups to your Item. These are only required if you plan to have modifiers for this Item. We'll cover the creation and use of Modifier Groups later in this tutorial.
- Some jurisdictions have different taxes depending on how the food is served. If this applies to you, select the approptiate tax for each service method. As a reminder, you set up your taxes by navigating to Setup > Store > Taxes.
- Products can have different sizes, prices, a special (promo) price and cost.
- Enter the size name.
- Enter the Regular Price.
- Add a special (promo) price, if needed.
- If you added a special price, add the times and days you want this price to apply. In the example above, the special price is applicable all day on Tuesdays only.
- Add a cost, if desired for tracking costs.
- If you want to use a Prep Printer for the Item, assign it by clicking the applicable Prep Printer number.
- The KDS option is only for legacy KDS systems, and not used unless you have the legacy Bematech KDS system. Most of our customers find the Prep Printer more than sufficient for kitchen prep printing.
- Press [Save] to save this Item.
Food Service Modifier Groups
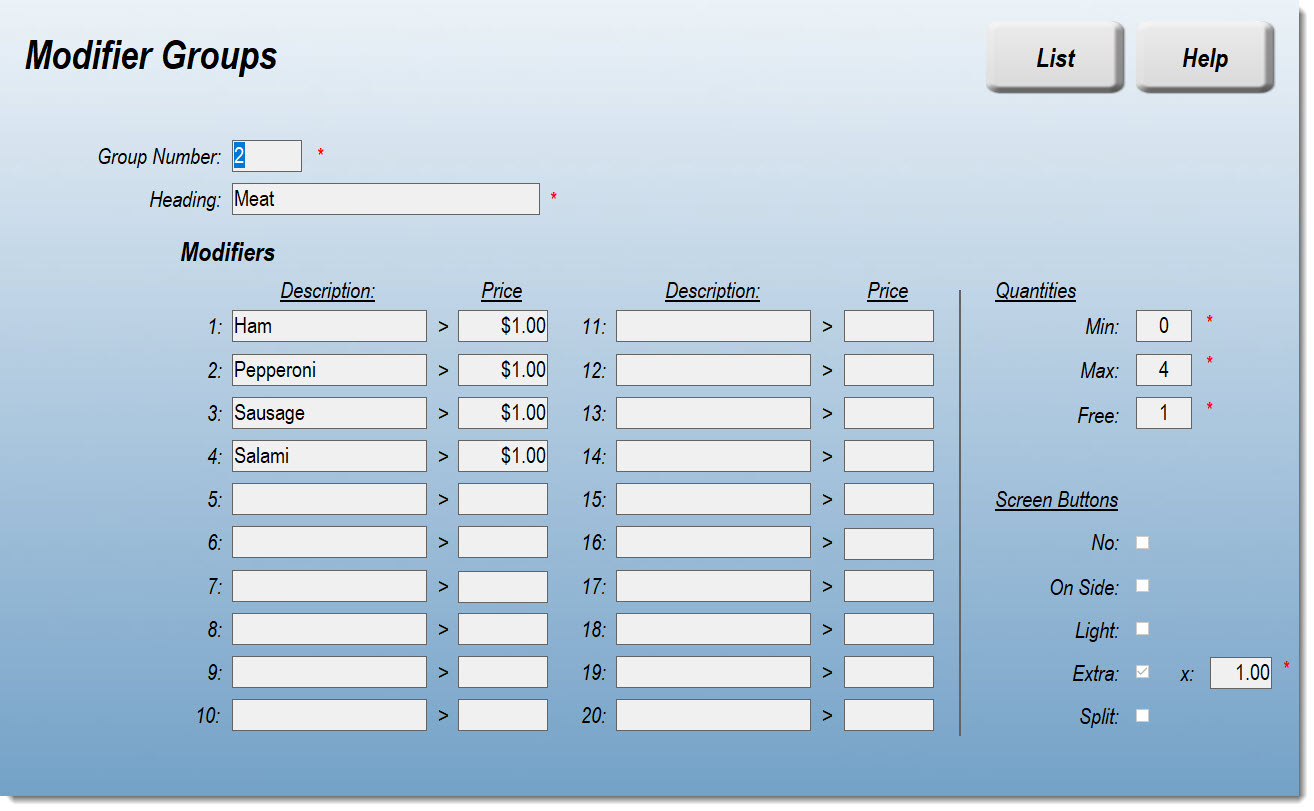
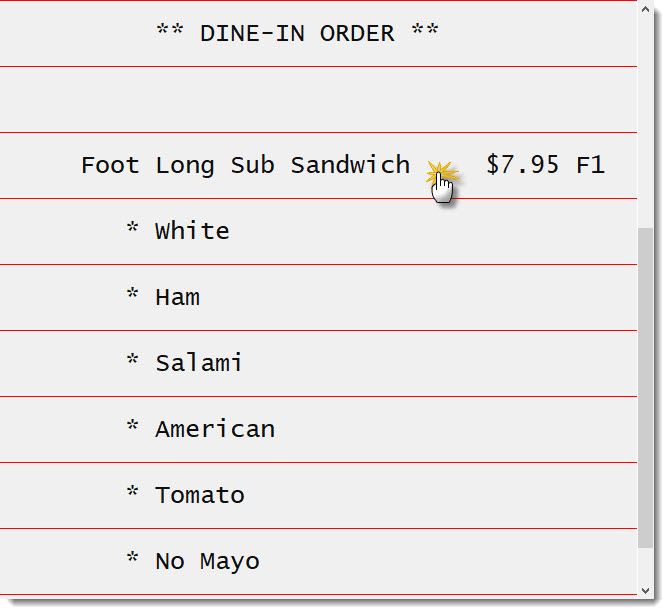
Below is a screenshot of a Food Service Modifier Group, accessed by pressing [Modifiers] on the Food Service Items menu screen.
In the above example, we have the "Meats" modifier group for the Sub Sandwich used in the first image. We'll explain how each field is used. If you press [New] you can create your own Modifier Group to be applied to your Food Service Items. You can also use a Modifier Group on multiple Food Service Items, if they are similar.
- If creating a new Modifer Group, the Group Number field will automatically populate and shouldn't be changed from the default in most circumstances.
- The Heading is the name of the Modifier Group. That name will appear in the POS Food Service Item screen, which we will cover later in this article.
- You can create up to 20 different modifers in a group. In the example above there are four different meats available. Each is priced at a $1.00 additional cost (some of which can be added free - see below).
- Under Quantities enter the decimal value (number) of:
- Min: The minimum number of modifiers in the group that must be selected before the Item can be sold. This ensures that a required quantity is selected.
- Max: The maximum number of modifiers that can be selected. In this case the entry is '4', but if you wanted to restrict the sandwich to 2 meats maximum, you would enter '2'.
- Free: The number of modifiers in this group that will have no charge, regardless of the Modifier Price entered. In this example, the first item selected will be free, and each additional meat will add $1.00 to the bill.
- You can also add additional buttons to the Group Screen, which are pressed before selecting a modifer to provide additional cooking instructions:
- No: Adds a button you can press to specify NOT to add a modifier. For example, if your modifiers had condiments, you could press No > Ketchup. The Prep Printer would then specify "No Ketchup" as a cooking instruction.
- On Side: Place the selected modifier on the side.
- Light: Add a light quantity of the selected modifier.
- Extra: Add an extra portion of the selected modifier. You can also add an additional charge for the extra portion in the 'x" field to the right. In this example, an extra portion of a meat modifier is an additional $1.00 charge.
- You cannot charge an "Extra" fee on the items that are included (Free). If you need to do this, you should add additional Modifiers like "Extra Ham" etc., with a price for each. Then you could select the "Extra Ham" modifier after the regular (free) Ham modifier, ensuring that the customer is charged for the Extra portion.
- Split: Useful when making items where only the left or right half of an item has the selected modifier. For example, if the Group is for pizza toppings, you may want to allow for split modifiers. Then when taking the order from the customer you would specify "L" or "R", followed by the modifier for that 1/2 of the pizza.
- Press [Save] to finish creating a new Modifier Group. The group is now available to be attached to your Food Service Item.
POS Screen
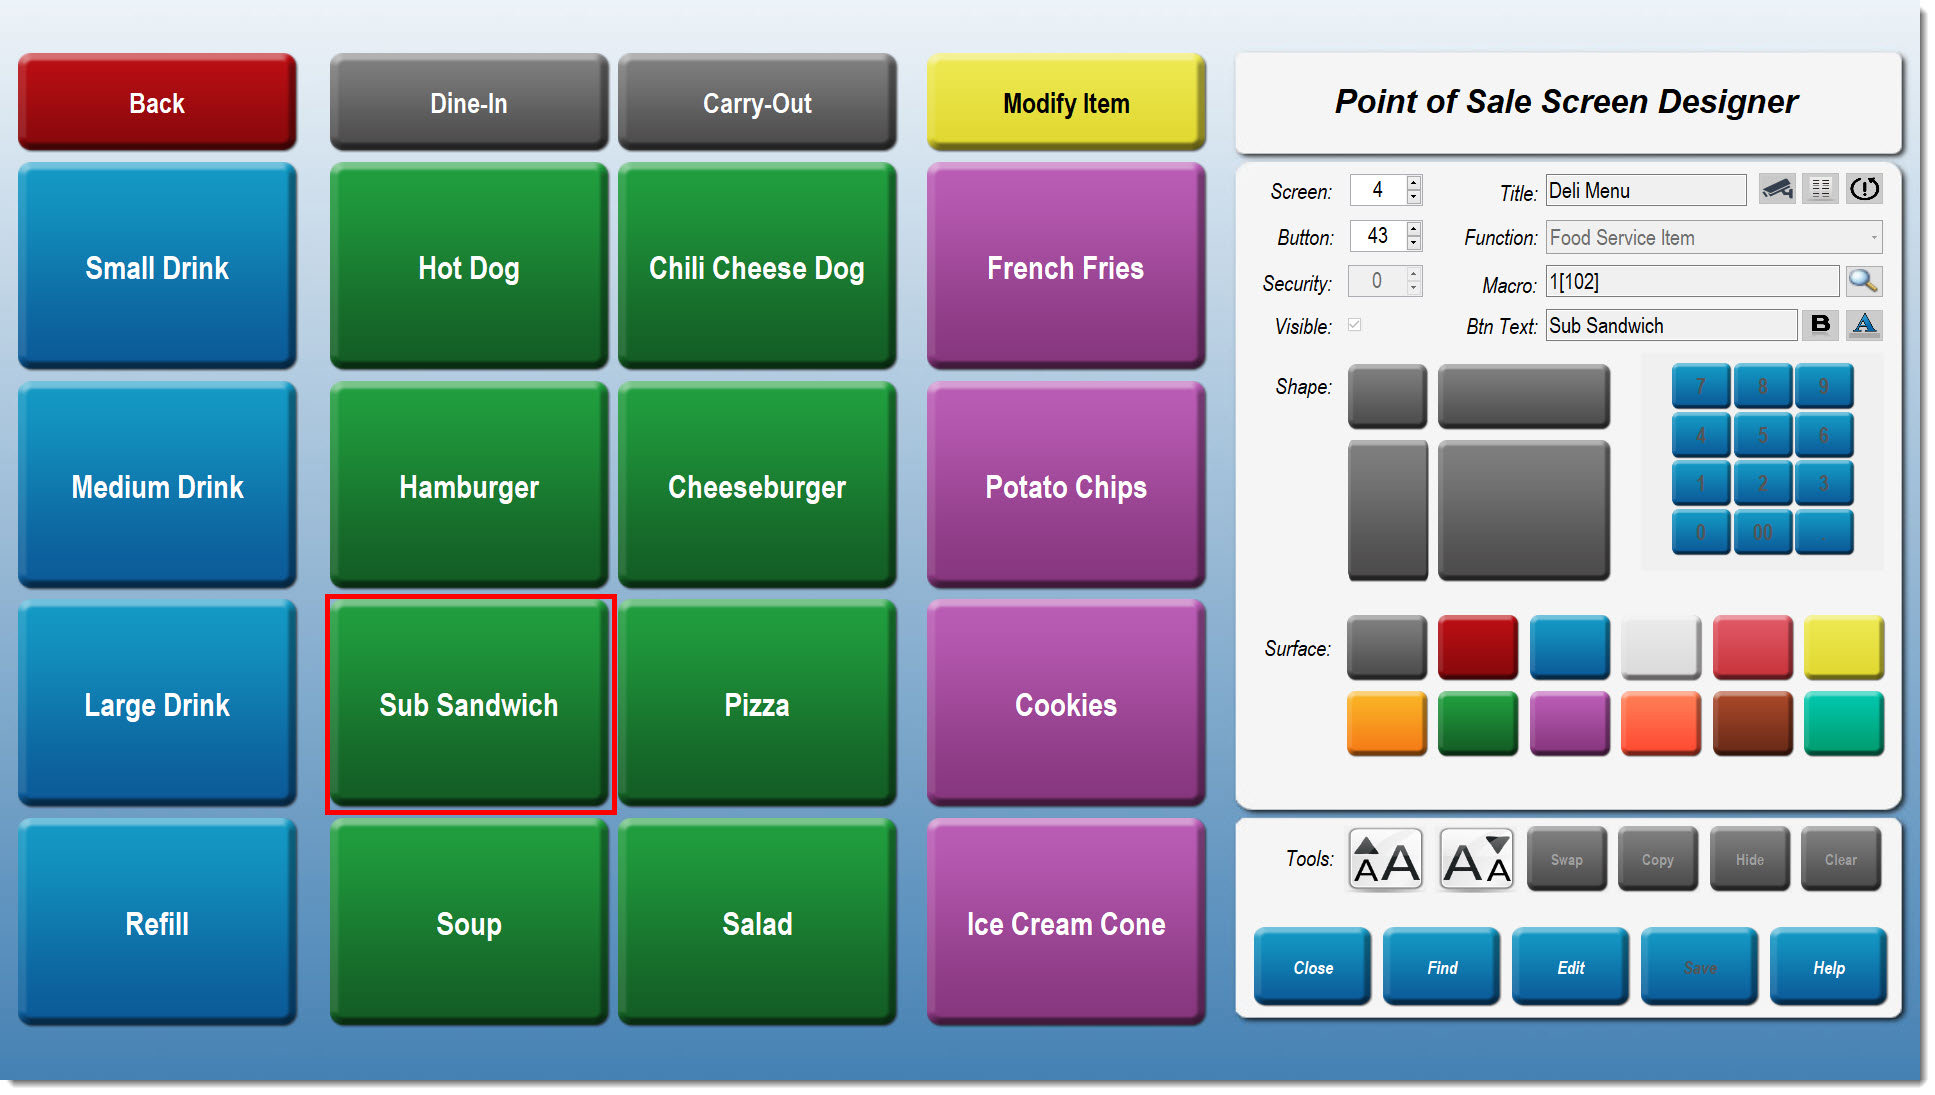
Now that you have your Food Service Items created (with or without Modifier Groups), you need to create a screen (or just add a button) for the sale of your Food Service Items. Because these items don't have scannable barcodes, they can only be sold via button press. If you've watched the Using the Screen Designer video article, you should be familiar how to create a new screen or screen button. To create a button for your Food Service Item:
- Navigate to Setup > Store > Other > Screens.
- On the screen you've created/selected, press [Edit] on the lower right of the screen.
- Create a button using the Food Service Item function.
- In the example above, you can see that the button named "Sub Sandwich" is using the Food Service Item function.
- Once the function is selected, click the magnifying glass icon next to "Macro" to select the Item you want the button to point to.
- Edit the Button Text if necessary.
- Because we're working with Food Service Items that may have to be modified once the item is rung up, be sure to add a button somewhere on your POS screen(s) using the "Modify Item" function. We'll cover the usage of this button later in this tutorial.
- Press the [Save] button on the bottom right to save your changes.
POS Usage
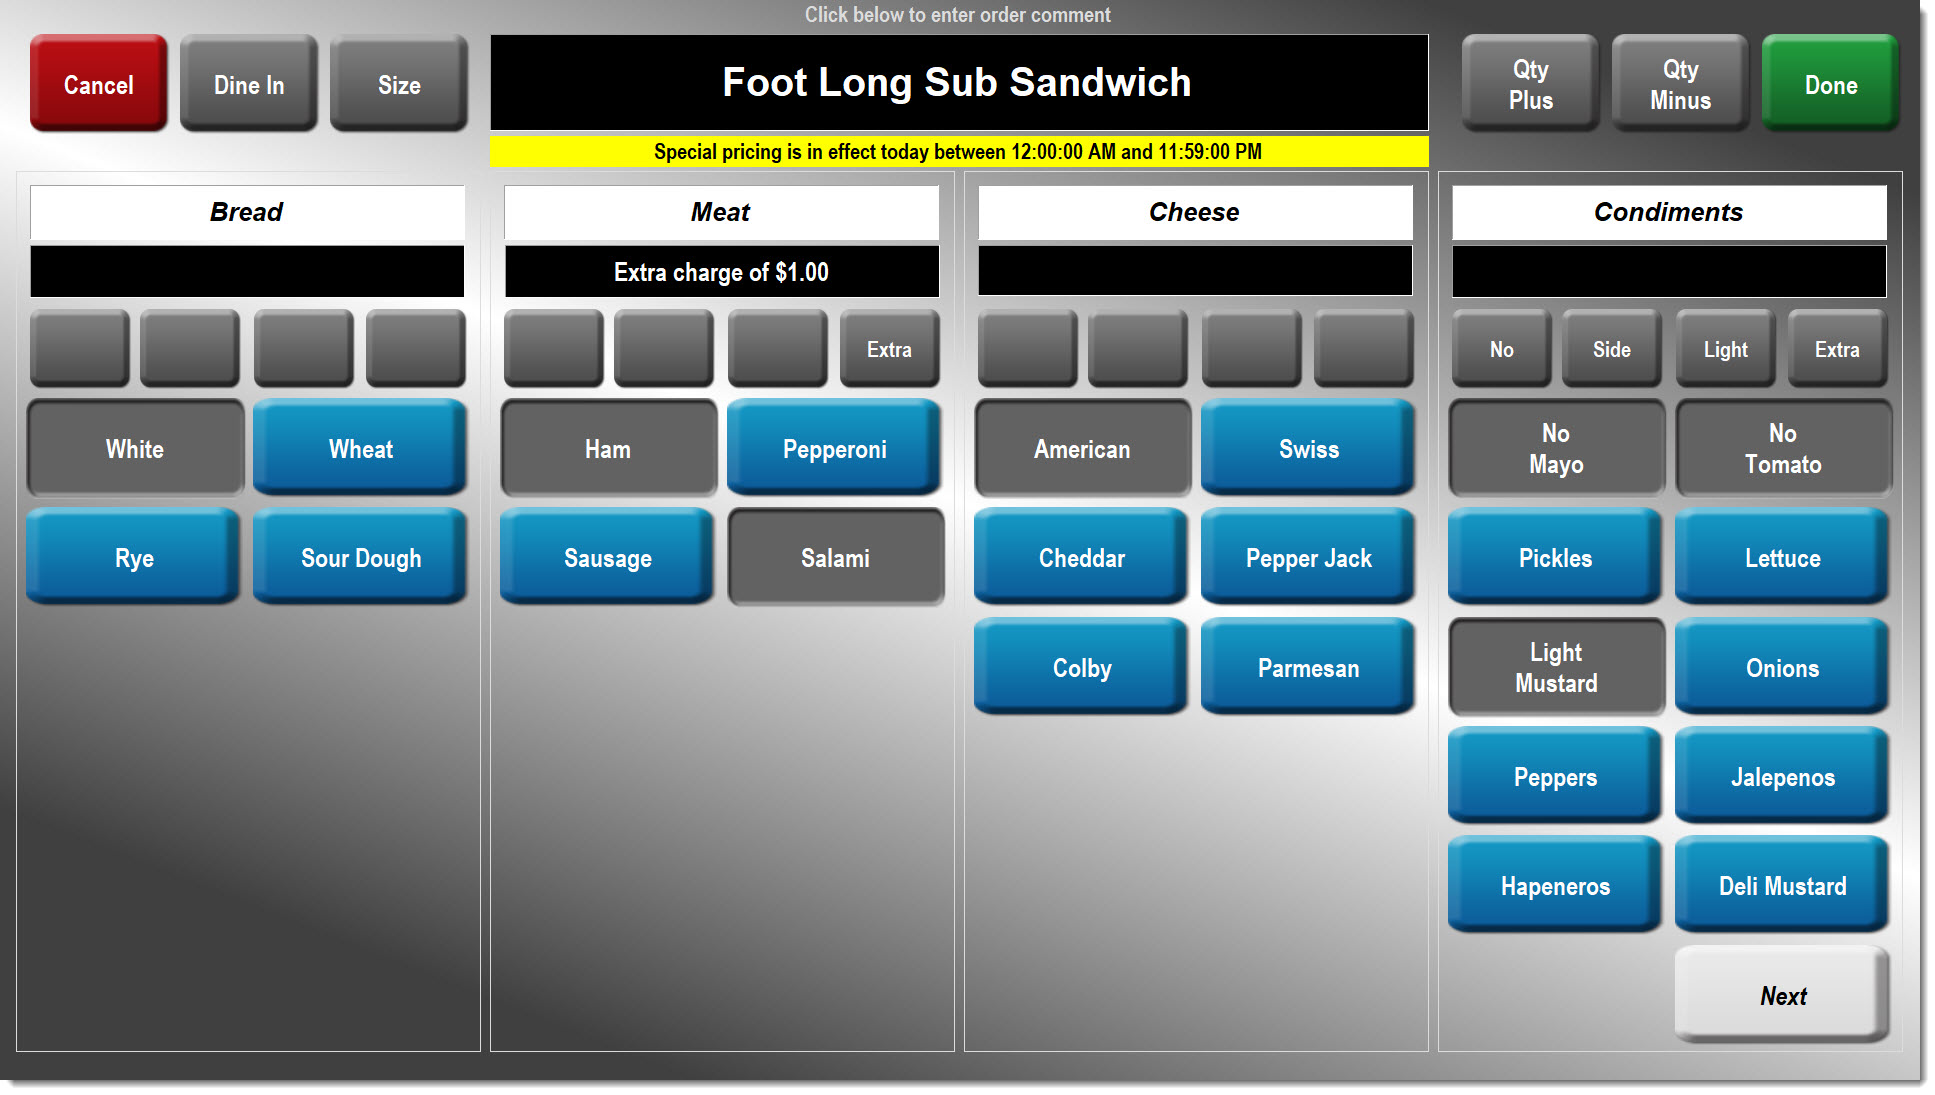
Now that your screens are created, you can sell your Food Service Items. When you launch the POS and press a Food Service Item button, the below screen will appear. In this example, we'll continue using the Sub Sandwich we've been working with:
In the above example you can see that we've pressed the Sub Sandwich button. Let's review the screen starting from the top left:
- The first button is the red [Cancel] button, which lets you cancel this Item order.
- Next is the [Service Type] button. Pressing it will cycle through the available choices: Dine In, Carry Out or Drive Thru.
- In this example the register preference has been set to Dine In (Setup > Register > Preferences). Doing so will default the button to Dine In.
- The [Size] button can be pressed to cycle through the assigned sizes for this Item. Because the "Foot Long" size was on special price, a yellow alert banner is displayed.
- The [Qty Plus] and [Qty Minus] buttons can be pressed to adjust the quantity of this Item.
- The green [Done] button will conclude this Item sale and return to the POS.
- Four Modifiers are shown below the top row, allowing for selection of modifiers:
- "White" was selected as the Bread modifier. Since the max is '1' for this modifier, pressing another Bread modifier will result in a warning.
- We've selected two Meat modifiers. Because only one is free (included), the extra charge is reflected.
- A single Cheese modifier is selected.
- Condiment modifiers are selected using the restriction buttons.
- "No" used before pressing Mayo and Tomato.
- "Light" used before pressing Mustard.
- Since there are more modifiers for Condiments then can be displayed, pressing the [Next] button at the bottom will cycle through additional choices.
- Now that the Item modifiers have all been selected, pressing the green [Done] button will return you to the POS and the receipt area will be shown below.
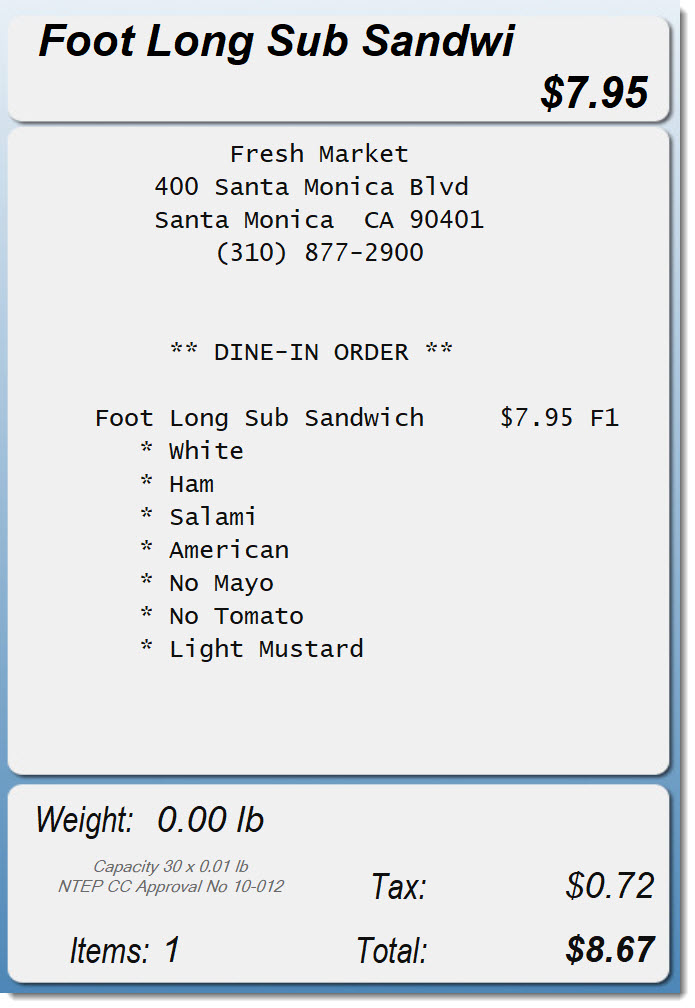
If there is an correction you need to make on this Food Service Item (or you wish to cancel it), you will need to press the Modify Item button. This will cause the receipt to display with red lines (similar to the VOID function). Click on the name of the Item you wish to modify or cancel. This will bring you back to the Food Service Item POS screen. You can then make changes and click [Done] to accept the changes. Or, you can click [Cancel] and the Food Service Item will be removed from the transaction.
POS Options
With your Food Service Item(s) rung up, you can now conclude the transaction. If you have assigned Prep Printers to the Item(s), a prep receipt will also print out. Even if you do not have a dedicated network Prep Printer, you can still use this function. In Setup > Register > Devices, click on Prep Printer. Select which Prep Printer you want to create and assign the fields to the same settings as your Receipt Printer. Then, when you conclude the sale not only will the customer receipt print, but the prep receipt will print on the same printer. You can then hand the prep receipt over to your kitchen staff for preparation.
If you're not yet ready to conclude the transaction because this was a call-ahead order, you can use the Order function to place it on hold for future pickup. You can then recall it when the customer arrives with payment. By using the Order function you can save the order and either print to the Prep Printer immediately (so the order is ready when the customer arrives) or wait for payment.
Reports
There are a few reports you can use with Food Service Items, to assist you with managing your food service business:
- Food Service Item Sales Report (Reports > Inventory > Sales > Food Service)
- Food Service Items List (Data > Inventory > Other > Food Service > Items > List)
- Food Service Modifier List (Data > Inventory > Other > Food Service > Modifiers > List)