Brecknell 67XXU USB/Serial POS Scale
StoreTender supports the use of the Brecknell 67XXU POS Scale, when used with a serial cable. A USB cable connection is not supported.
Connect your scale using the included serial cable to an available COM port on your PC. Make note of the COM port you used (i.e. COM1). Turn on the scale.
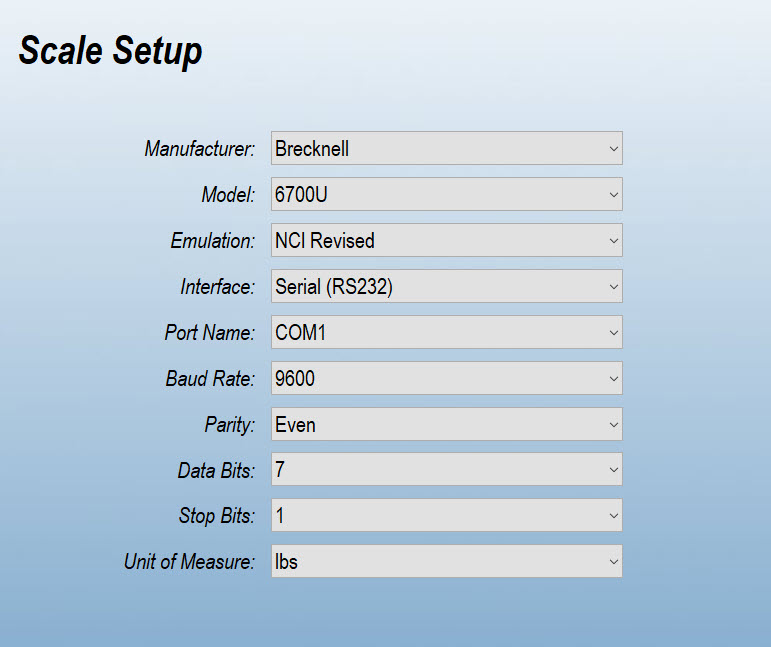
In StoreTender, navigate to Setup > Register > Devices > Scale. Enter the settings as shown below, replacing the Port Name selection with the COM port you connected to.
Save your changes and press the TEST button. Add weight to the scale and see if the scale registers. If it does you are complete. SYNC your POS to accept the changes to the hardware (green button on main menu).
If your scale does not register the weight, you need to make changes to the default settings of the scale to work with StoreTender.
Download a copy of the Scale Service Manual for reference. This PDF document contains setup information for your scale.
You will need to ensure that the scale is set to the below settings, as they may vary from the Default Settings. Enter the Setup Mode on the scale and navigate the Setup Menu. All changes below are under the USER menu.
The configuration/calibration switch must be set in the ON position in order to make changes to specific parameters. See section 8.1 of the Scale Service Manual for instructions on turning this switch ON.
Press the [HOLD] + [ON/OFF] key for 3 seconds. The indicator shows "CoNFG" to indicate that you are in Setup Menu mode.
The first change you need to make is to the following menu item:
USER > COM2 > OUT.MD > CMD
- COM2 Output Mode set to "CMD" (output after a request command is received).
- Press the [UNIT] key until you see "USER". If you pass it, press [HOLD] to move backward.
- Press the [TARE] key to enter the USER menu.
- Press the [UNIT] key until you see "COM2".
- Press the [TARE] key to enter the COM2 menu.
- Press the [UNIT] key until you see "OUT.MD".
- Press [TARE] to enter the OUT.MD menu.
- Press [UNIT] until you see "CMD".
- Press [TARE] to select CMD.
- Press [ZERO] to return back up and return to the setup menu.
Follow the above instructions to make the changes to the next two menu items, starting at the USER menu (section 5.3.2 of the Scale Service Manual) and navigating to the final item. Use the [UNIT] and [TARE] keys to navigate and select as you did above. Use [ZERO] to return back up when completed.
USER > COM2 > LYOUT > SCP01
- Protocol set to "SCP01" (emulates NCI Protocol).
USER > OTHER > LEGACY > 2
- Status bit setting set to "2" (all data sent out has 3 status bits and 7 weight characters).
Once complet you need to exit the setup menu:
- Power off the indicator by pressing and holding the [ON/OFF] key.
- Turn the indicator back on by pressing the [ON/OFF] key. The display will go through a digit check, then settle into the normal operating mode. All front panel keys will now return to their normal mode of operation.
- The configuration/calibration switch must be set in the OFF position.
See your documentation or supplier/vendor for instructions on doing this if you're having difficulty.
Bu mövzu kifayət qədər köməkçi oldu mu?
Çap
Digər Başlıqlar
Receipt Printer
StoreTender supports receipt printers from a wide variety of manufacturers. This guide will help...
